
About Apple’s AirDrop…
It is estimated that by the end of this year 2020, 1.7mb of data will be created every second for every person around the earth. We rely on internet sharing for most of the data unlike a few years ago when we were happy with the slow data transfer rate via Bluetooth.
We still prefer data transfer via closed network services like share-it, Xender, wi-fi share, and the most used AirDrop. But to use AirDrop, it’s mandatory to have an apple device, because you don’t get this option in any other device anyway. It should be noted here that these methods are preferred only when the participating devices are in the wifi range of up to 10 meters. For distances above that, the internet works fine.
Apple has always been the most innovative brand since the time they were born in the phone market, when every other phone was following a basic cliche operating system, Apple.Inc chose to bring their own fully private operating system called iOS.
Similarly, Apple has given AirDrop to its customer, which performs data and media transfer tasks more efficiently and quickly than other data transfer options. AirDrop strictly works on Apple devices to Apple devices only.
Xender is said to be the fastest OS neutral and individual data transfer app/option of all, with the top speed of 40 mbps. While AirDrop beats Xender with an unbeatable margin, its speed boosts at 490 mbps. Yes you heard that right, it makes almost a GB transfer in merely 2 seconds. Scarily fast, isn’t it?
Lets learn how to use Apple’s homegrown data transfer AirDrop feature, transfer files from Mac to iPhone and vice versa. Keep reading the article.
How AirDrop Works…
AirDrop uses the combination of both WiFi & Bluetooth of your iphone or mac. As this feature is available for use between iOS to iOS, iOS to macOS (both ways), macOS to macOS only, the same credentials makes the transfer process the safest and fastest way of data transfer in the world.
AirDrop doesn’t use internet data, so you keep your phone data connection off & wifi not connected with any source or router.
AirDrop From Mac To iPhone.
To start the AirDrop and transfer files and data from Mac device to iPhone i.e. macOS to iOS, follow the stepwise procedure written down below.
Step 1: Swipe up from the bottom of the screen if you have an iPhone 8 or previous one.
Or
Drag down the window from the top right corner of the screen, if you have an iPhone X or later.
Step 2: Tap and hold OR push-in (if your iphone has 3D touch) on the connection services box. Now you can see multiple options in the list.
Step 3: Turn the WiFi & Bluetooth ON. No need to connect the WiFi to any network.
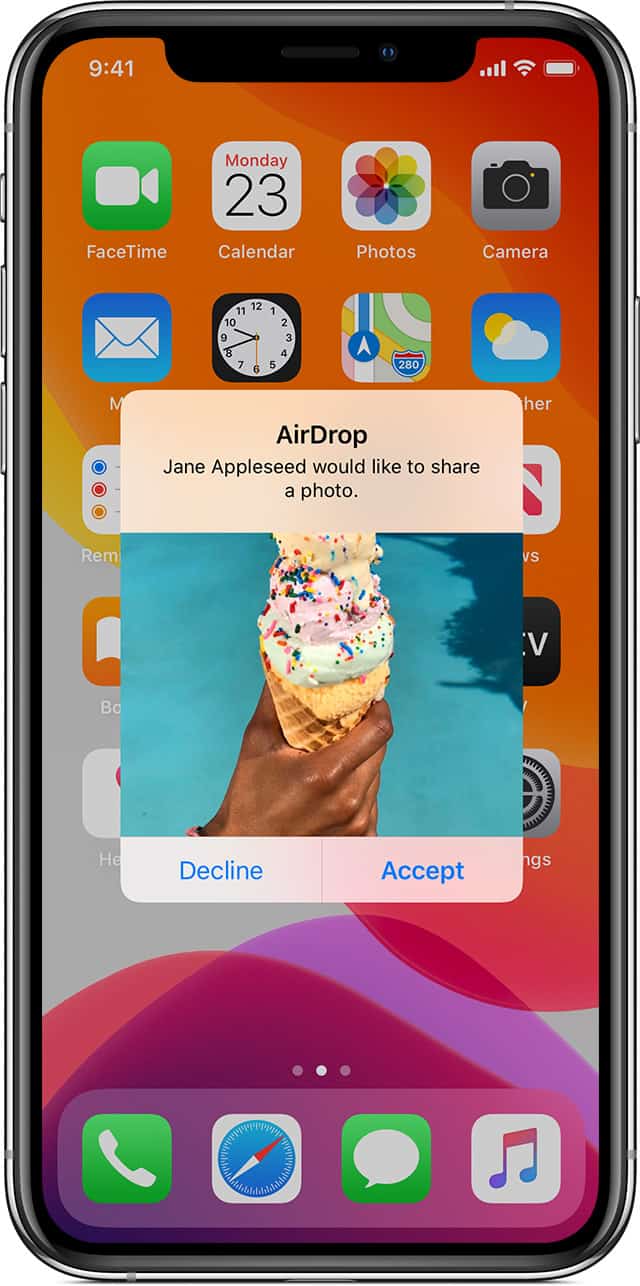
Step 4: Now touch on the AirDrop icon to turn it on, following by clicking on the “Everyone” option.
Step 5: Now click on the Search icon present on the top right-hand corner of your Macbook’s screen. Write Bluetooth in the tray and click on the search button.
Step 6: Once you find Bluetooth, click on it and you will find a new window popped up on the screen.
Step 7: Select the Turn Bluetooth On option from the pop up window.
Step 8: Search for WiFi the same way, and turn it On too. No need to connect the WiFi to any network.
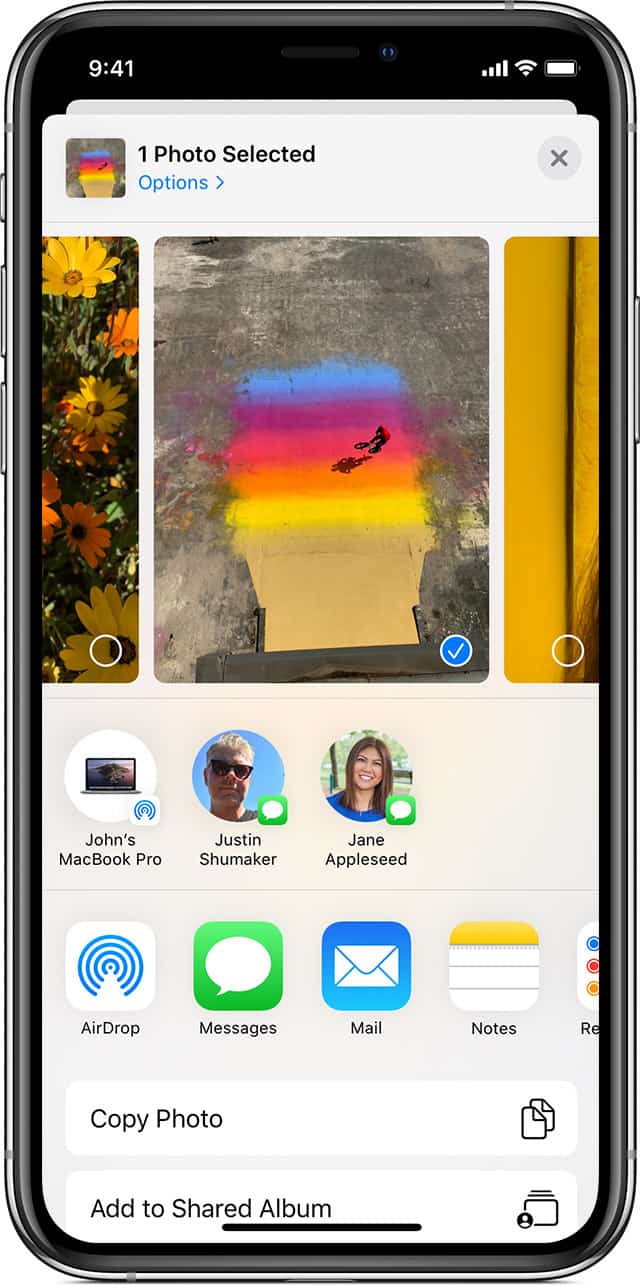
Step 9: Select the file on your Macbook, which you want to share with your iphone.
Step 10: Tap on the “share” icon present on the top right options plate on the window.
Step 11: Click on the AirDrop option & let the bluetooth find your iPhone. Keep your iphone unlocked during this step.
Step 12: It takes a few seconds generally, once your iPhone is found by the macOS system, click on your iPhone’s name and it’s done. The file you selected is transferred already.
AirDrop From iPhone To Mac.
To start the AirDrop and transfer files and data from iPhone to Mac device i.e. iOS to macOS, follow the stepwise procedure written down below.
Step 1: Now click on the Search icon present on the top right hand corner of your Macbook’s screen. Write Bluetooth in the tray and click on the search button.
Step 2: Once you find Bluetooth, click on it and you will find a new window popped up on the screen.
Step 3: Select the Turn Bluetooth On option from the pop up window.
Step 4: Search for WiFi the same way, and turn it On too. No need to connect the WiFi to any network.
Step 5: Swipe up from the bottom of the screen if you have an iPhone 8 or previous one.
Or
Drag down the window from the top right corner of the screen, if you have an iPhone X or later.
Step 6: Tap and hold OR push-in (if your iphone has 3D touch) on the connection services box. Now you can see multiple options in the list.
Step 7: Turn the WiFi & Bluetooth ON. No need to connect the WiFi to any network.
Step 8: Now touch on the AirDrop icon to turn it on, following by clicking on the “Everyone” option.
Step 9: Select the file on your iPhone, which you want to share with your Mac.
Step 10: Tap on the share icon, present on the bottom left corner of your iPhone’s screen.
Step 11: Click on the AirDrop icon present on this new slider window, now you will see your Macbook’s name on it.
Step 12: Generally it takes very few seconds, as this AirDrop feature searches faster on the iphone than in comparison to Macbooks. Click on your Macbook’s name and you’re done, the transfer would be done at a brilliantly higher speed & check again, the data should be sent already now.
We would highly recommend you to use AirDrop for files transferring purposes as it is the safest and the fastest way till now. Using apps like Share-it or Xender are chinese brands and can’t be trusted as much as Apple.inc. For transfers which are made from iOS to other OS devices or vice versa, use WiFi drop or bluetooth, and if you find these methods too slow, you always have the option of using the internet cloud.
For further details, you can always visit Apple’s official website or click on https://support.apple.com/en-us/HT204144 to directly land on the page, explaining how to deal with this issue.
I hope I could address all your queries and now you can easily resolve the How To AirDrop From Mac To iPhone & Vice Versa Issue. If you have any further doubts, you can visit or contact your service provider or you may leave a comment below. Also, please leave a like on the content if it was helpful. And do tell me about your experience in fixing this issue, in the comment box.